A Lesson Learned the Hard Way. How To Fix a Hacked Website
Contents
Last month, I had to deal with a situation I have never had to deal with before. One of my clients had there website hacked. Fixing it was one of the most stressful experiences I have had since becoming a Freelancer. It has made me look again at my whole website building and management processes. The learnings I gained make me glad it happened. The experience at the time was not something I ever wish to happen again. Let me tell you about it.
How to tell if someone hacked your website?
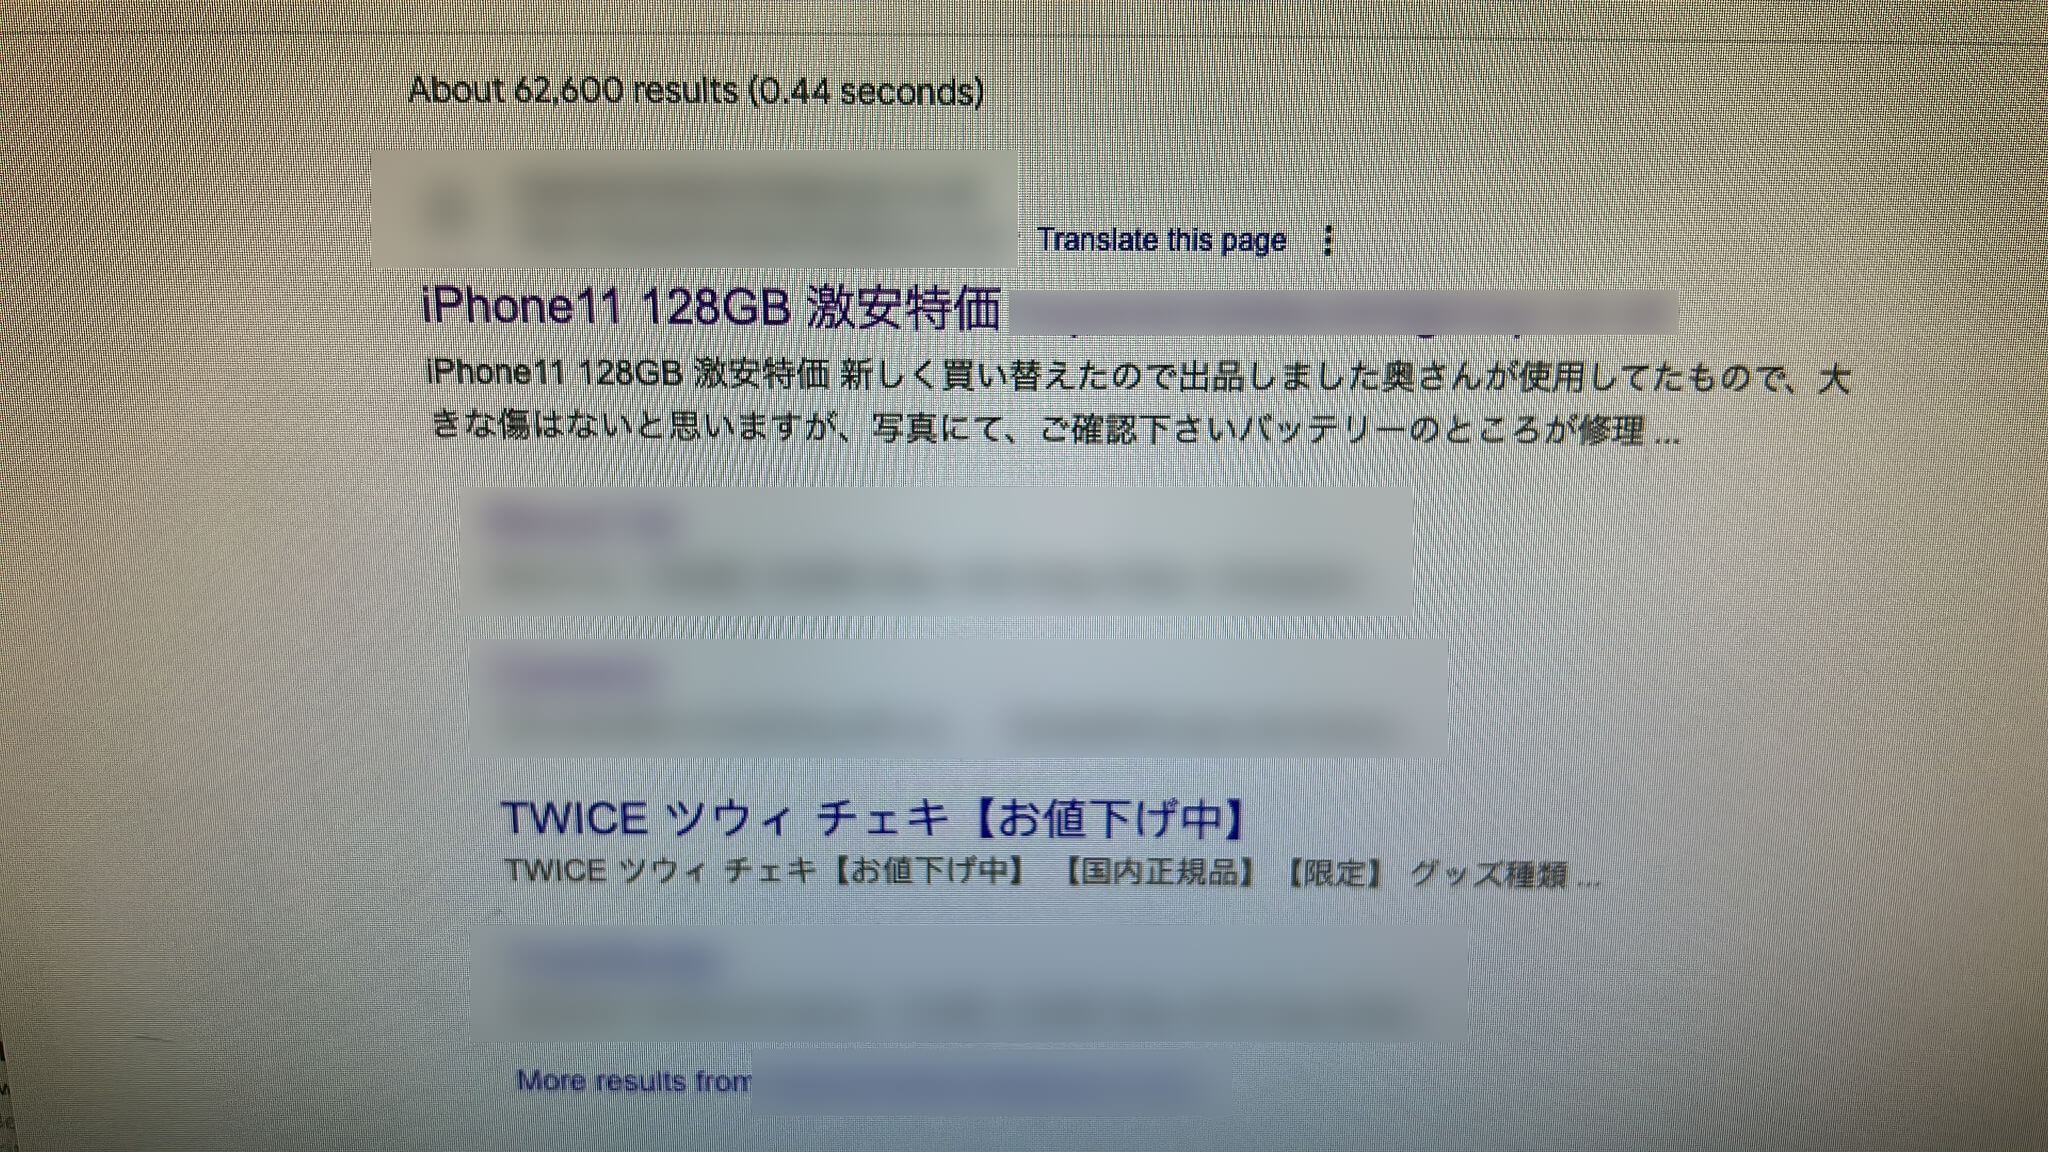
In late October, my client sent me a WhatsApp showing a picture of the website's Google search result. All the links had changed to Japanese text and now linked to a different website trying to sell iPhones. After extensive research I learned this was the Japanese Word Hack.
When I first took over management of the website, I had not thought to do any kind of security review. It turns out, there was no security in place at all on their site. It was ripe for the picking. For me, I had never had to deal with this before. I was upfront with the client and told them it might take some time for me to find a way to restore their site. Here is what I did.
How do you fix a hacked website?
The first thing I tried was to use the Google Search Console to re-crawl the site. Naively, I hoped this would be a quick fix to the search results. It wasn't. Next, I contacted the hosting company for advice. They pointed to a free website security checker, https://sitecheck.sucuri.net/. The site checker told me of a few files that had some malicious code embedded in them. I went into those files and removed the malware. I thought that was enough. I did not realise the extent of the malware infection. The search results did not go back to normal. I had to go deeper.
I spoke to the hosting company, they gave me SSH access to the web server. I logged in and ran a ClamAV malware scan. It came back with no malware detected. Frustrating. I then logged into the WordPress dashboard. I installed Wordfence which is the standard WordPress security plugin. I ran a scan with Wordfence and found over 150 infected PHP and JavaScript files. I had to go into each one of those files and manually remove the malicious code. It was a time-consuming task. Once the malicious code was gone, I could breathe again. I requested another re-crawl of the site and the Google search results returned to normal. Phew!
What can you do to prevent someone hacking your website?
Having removed all the malicious code from the website, it was time to prevent it happening again. Wordfence comes with a Firewall which protects against several types of attacks. Using this plugin is specific to WordPress websites. The other measures I took are more universal.
An outdated website is a vulnerable website
It is vital to keep your website and all the technology around it up-to-date. For WordPress websites, you can enable auto-updates for your plugins and WordPress itself. I recommend you do this. Each update will contain several security patches for vulnerabilities in the old code. Having your site update by itself will save you time and effort.
If you use managed hosting you will not need to worry about keeping your server updated. (If you have never had to use a terminal like the one pictured, you likely have managed hosting). If you host your website yourself, it is up to you to make the necessary updates on your server. You can likely set up automatic updates if needed. Make sure everything has the latest security updates. I cannot stress that enough.
The principle of least privilege
Some companies and developers have a very cavalier attitude towards security privileges. They do not adhere to the principle of least privilege. The principle of least privilege states: no user should have more access to files and data than they need. Let's go deeper.
Any file or piece of data has a set of permissions attached to it. These permissions dictate who can read, edit or delete that file. Administrator access refers to a user that can do anything it wants to a file. Give this kind of access sparingly. When it comes to website files, any files needed to render a website in a browser should have read access only. All other files and data should only be accessible by the web server it self. They should not be accessible externally. When creating or updating files and data, the web server should have permission to do this. Any request to change data must go through the web server. This gives much more control over the state of your files and data. (I will attach a link showing the best file permissions for WordPress at the end.)
When creating users, whether in a CMS or on a web server it is important to limit access as much as possible. Take WordPress, for example, giving every user Admin rights creates unnecessary security risks. Having Admin rights enables that user to change anything on the site. No matter how trustworthy they are, accidents can happen. Clicking on the wrong thing could bring down your site. When creating users, only give them access to what they need. Someone who manages content should not be able to make changes to any code or configurations. To sum up, only give people the access they need, nothing more.
Follow basic password guidelines
Password security seems to be a point of annoyance for many people. Regularly changing their password. Having to adhere to password character rules. It's all too inconvenient for some people. Not doing these things can have a devastating effect. If your website gets compromised, the first thing you should do is change all the passwords. If a hacker obtains a password and gains access to your website, you can stop them in their tracks by changing it. The password they worked so hard (or not) to get is now useless. One of the best security measures you can take is creating a strong password and updating it often.
HTTP Security Headers
This is more techy. If you are not a Developer or IT Professional, you can skip this bit. Somewhere in your website configuration you should set your HTTP Security Headers. In my case, I put them in the .htaccess file. There are other places you can put them. For Nginx sites, you can put them in server blocks on nginx.conf. You can even put them in HTML meta tags, although I wouldn't only do that. (To understand more about HTTP security headers in .htaccess I will link the resource I used below.)
What did I learn from fixing a hacked website?
This presented to me a major oversight in my knowledge. Looking back it seems so stupid that this wasn't something I was already equipped to deal with. As I said earlier, I am glad of the experience because it opened my eyes to a major gap in my knowledge. Going forward, I intend to place a much greater emphasis on website security. The learnings from this experience will inform my work in the future. I will attempt to stay on top of website security protocols as they evolve. I hope I never have to deal with this again. Although, I am glad to have this experience and knowledge with me now.